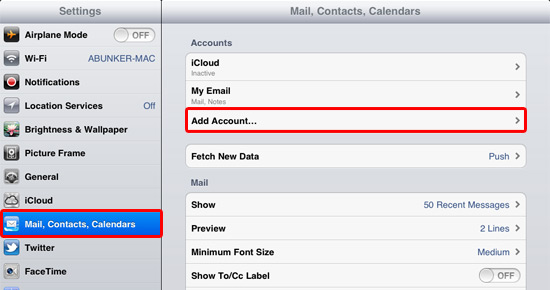
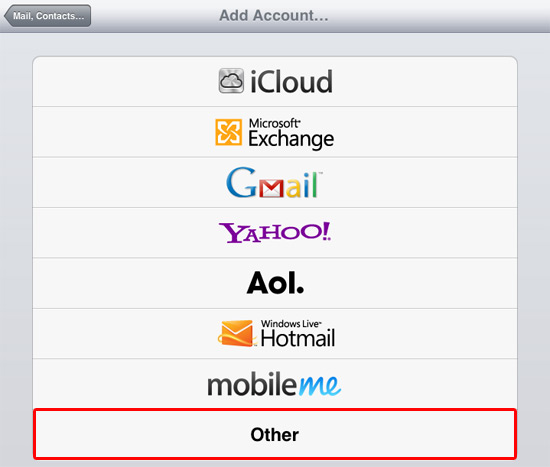
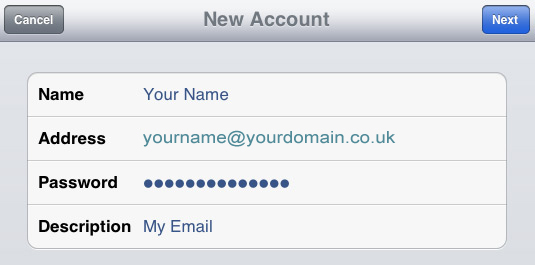
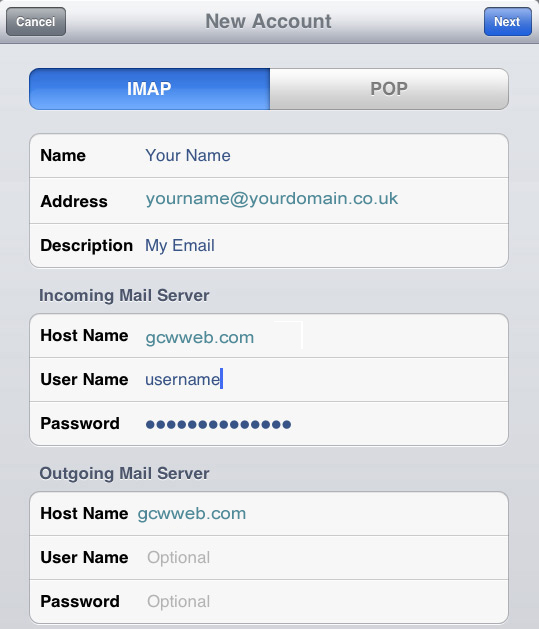
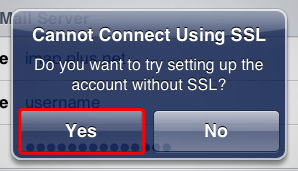
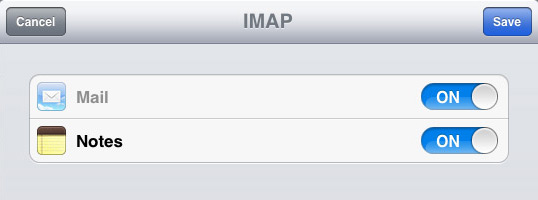
Setting Up email on an Iphone, Ipad, or Ipod

 
The screenshots shown here were taken on an iPad. Although the screen layout will be slightly different on an iPhone or iPod Touch, the same steps apply for both.
 

You can use these instructions to set up email for a domain hosted on your account.

  1. From your home screen press Settings.

    From your home screen press Settings.

  2. From the setting menu, choose Mail, Contacts, Calendars followed by Add Account…

    From the setting menu, choose Mail, Contacts, Calendars followed by Add Account…

  3. From the Add Account… menu choose Other.


    From the Add Account… menu choose Other.

  4. Fill in your Full Name, Email Address, Password and Description and press Next.

    If you need help with these, there's more detail underneath the screenshot.


    If you need help with these, there's more detail underneath the screenshot.

    • Full name:
      Enter your name (or the name you'd like people to see when you send them email)
    • Email Address: Enter the address you're setting up, this will be (yourname@yourdomain.co.uk)
    • Password: Enter the password for your email address we sent when you order the domain name
    • Description: Enter a useful description of the email address you're setting up (e.g. Work email). You can put whatever you want here

    Press Next to continue.

  5. More settings will appear. Some will already be filled in.

    Enter the Incoming and Outgoing Mail Server details and press Next. If you need help with these, there's more detail underneath the screenshot.

    Enter the Incoming and Outgoing Mail Server details and press Next. If you need help with these, there's more detail underneath the screenshot.

    • IMAP/POP
      This will default to IMAP - it's up to you which one you want to use

    Incoming Mail Server settings

    • Host Name: gcwweb.com
    • User Name & Password: Enter the username and password for the email address you're setting up

    Outgoing Mail Server settings

    • Host Name: gcwweb.com
    • User Name & Password: These are optional, but if you want to send mail while on the move (e.g. while connected to mobile or wireless networks), we recommend filling these in.

      Enter the username and password for the email address you're setting up we sent to you when you ordered your domain name

    When you're finished, press Next.

  6. If the box shown below appears, press Yes (you may need to do this twice).

    If the box shown below appears, press Yes (you may need to do this twice).

  7. After a minute or two, your email address will be set up and ready to use.

    If you chose IMAP when setting up you’ll be able to choose whether you want to use Notes (if you chose POP you’ll be taken back to the settings screen from step 2). Press Save when you’re done.


    If you chose IMAP when setting up you’ll be able to choose whether you want to use Notes (if you chose POP you’ll be taken back to the settings screen from step 2). Press Save when you’re done.

  8. That's all you need to do. To start checking your email, go back to your home screen and press Mail


A Hebridean Website Design and Hosting Company